(DI-1911) Example: Number of Errors in Inbound IDocs of the Message Type – Orders
In this example you find brief instructions how to create a custom KPI which displays the number of errors in inbound IDocs of the message type – orders.
For more information on how to create a custom KPI based on this type of collector, see (DI-1911) Create a KPI through the Collectors with a Custom KPI.
Contents
Step 1: Define a custom KPI
- Go to Settings > Monitoring settings (or transaction /DVD/MON_CUST).
- Click New Entries (F5).
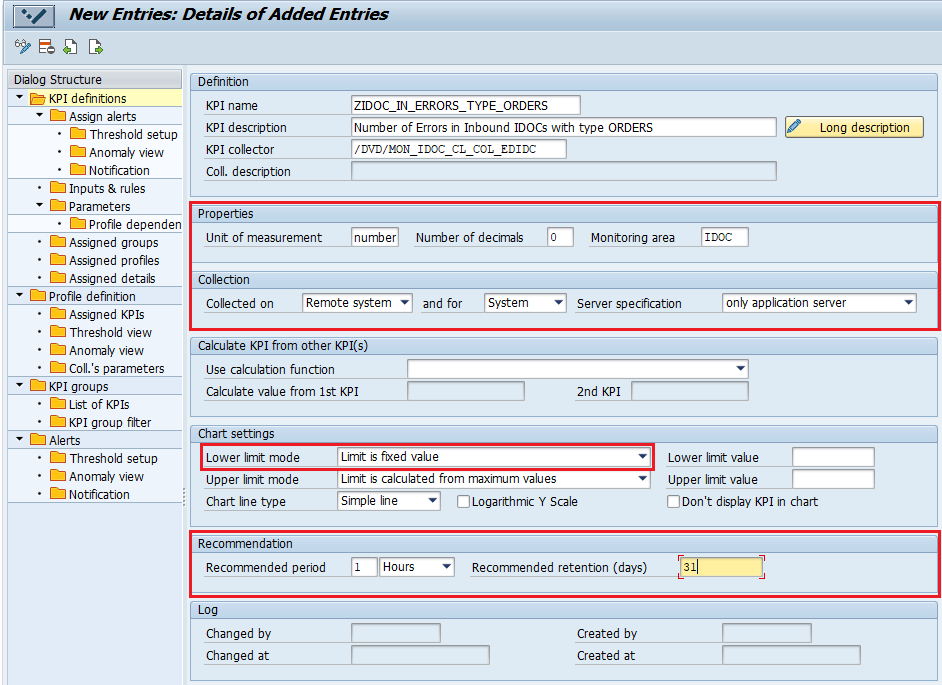
- Fill in all required fields for your custom KPI as displayed on the figure
- KPI name: ZIDOC_IN_ERRORS_TYPE_ORDERS. (Choose a name that starts with a capital Z or Y).
- Description: Number of errors in inbound IDocs with the type orders
- KPI collector: /DVD/MON_IDOC_CL_COL_EDIDC
- Fill in all remaining fields for a custom KPI as displayed in the figure. All the field descriptions can be found in (DI-1911) Define a Custom KPI.
- Save the KPI definition (CTRL + S).
Step 2: Choose how data is collected into the custom KPI through the Collector for IDocs
- Select Settings > Collector settings (or the transaction /DVD/MON_COL) o the main screen.
- Select the collector /DVD/MON_IDOC_CL_COL_EDIDC.
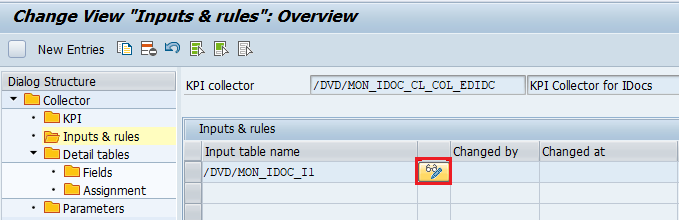
- Double-click Inputs & rules.
- Select Edit next to the Input table /DVD/MON_IDOC_I1.
- Click Switch mode (Edit) (CTRL + F1) and then Create new records
 (F6).
(F6).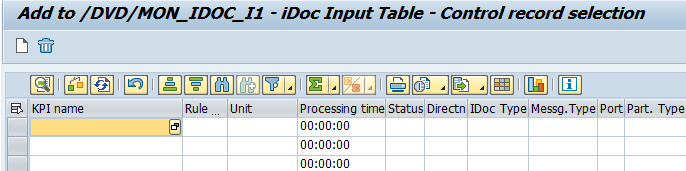
- Define new rules:
- Fill in KPI name with your custom KPI name. In our example it is: ZIDOC_IN_ERRORS_TYPE_ORDERS.
- Set Rule nbr. to 1.
- Set Unit to COUNT.
- Set Status to 51 (IDoc error status).
- Set Directn to 2 (for outbound).
- Set Messg. type to ORDERS.
- Set Into det. to X (optional) – in the case you would like to collect details for this KPI.
Set From l.run to X (optional) – in the case you would like to collect data only from the last run of the Collector job for IDOCs monitoring. When this field is empty, the Collector job will select all IDOCs in the past.
An IDoc has multiple error statuses. Therefore, you should create a new rule entry for each error status, according to the mentioned steps above. Fill in the other rules the same as the first rule for the following error statuses: 52, 54, 56, 60, 61, 63, 65. Please keep in mind that each rule should have a different Rule number.
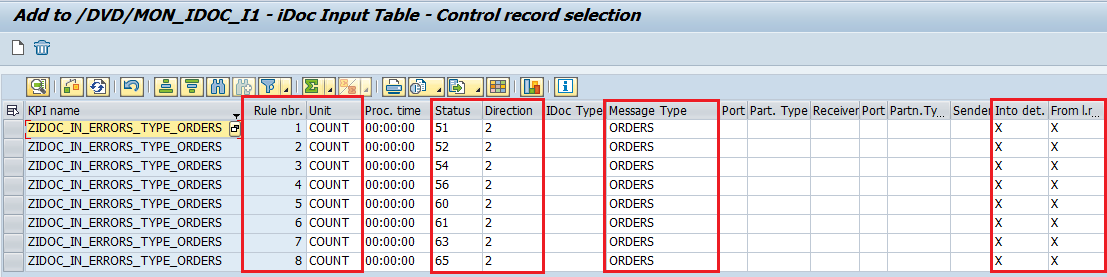
Save the entries (CTRL + S).
At this point you have created a new custom KPI ZIDOC_IN_ERRORS_TYPE_ORDERS, which collects information about Error inbound IDocs with the message type orders.
Step 2.1.: Assign the Detail table /DVD/MON_IDOC_D1 to your custom KPI (optional)
If you have set the field Into det. to 'X' in the Input table, you chose to collect KPI details into a Detail table. To display the KPI details, you should assign the default Detail table /DVD/MON_IDOC_D1 of this collector to your custom KPI.
To perform this:
- Select Settings > Collector settings (or the transaction /DVD/MON_COL) in the main screen.
- Select the collector /DVD/MON_IDOC_CL_COL_EDIDC.
- Double-click Detail tables.
- Select the Detail table /DVD/MON_IDOC_D1.
- Double click Assignment.
- Click New Entries (F5).
- Set the KPI name ZIDOC_IN_ERRORS_TYPE_ORDERS.
- Save (CTRL + S).
Step 3: Assign a Monitoring profile to the custom KPI
Before you start to collect the created KPI, you must assign it to a Monitoring profile. In this example, we don't create a new Monitoring profile, but assign the custom KPI to the default Monitoring profile IDOC_1HOUR.
- Go to the Settings > Monitoring settings (or transaction /DVD/MON_CUST).
- Double-click Profile definition.
Select and set a default Profile name IDOC_1HOUR. You may also create your own Monitoring profile as described in (DI-1911) Define a Monitoring Profile for a KPI.
If you create your own Monitoring profile, you should use your own Monitoring profile name in the next steps instead of IDOC_1HOUR.
- Double-click Assigned KPIs.
- Click New Entries (F5).
- Fill the KPI name ZIDOC_IN_ERRORS_TYPE_ORDERS.
- Save (CTRL+S).
The custom KPI ZIDOC_IN_ERRORS_TYPE_ORDERS is now assigned to the Monitoring profile IDOC_1HOUR.
Step 4: Schedule the monitoring of a custom KPI
The last step is to start the monitoring of the KPI for a specific system with its assigned Monitoring profile IDOC_1HOUR.
You may check in the Collector Jobs tab, if you created before a Collector job for the Monitoring profile of your custom KPI and if it is scheduled.
For information on how to schedule and start monitoring of KPIs belonging to a Monitoring profile, see (DI-1911) Schedule the Monitoring of KPIs.
If you created before a Collector job for your Monitoring profile of your custom KPI:
- Go to the Collector Jobs tab
- Find the Monitoring profile and click Stop and Start in the field Coll.job.
In the fields Last status icon and Job last status is displayed when the Collector job run is completed.
If you didn't create before a Collector job for the Monitoring profile, please see the example below on how to start the monitoring of the custom KPI.
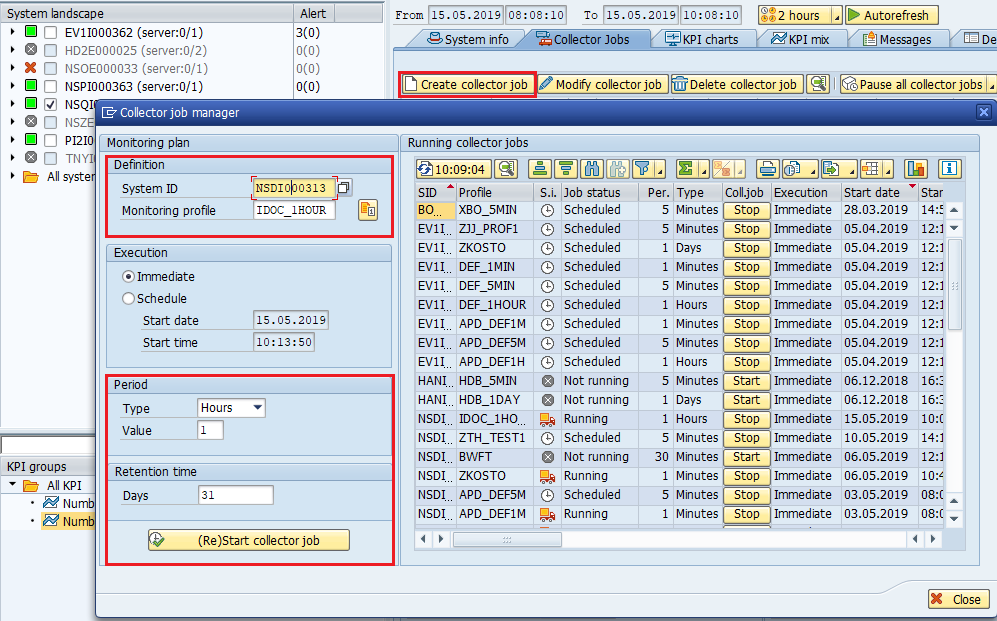
- In the main screen, go the the Collector Jobs tab.
- Select Create collector job.
- Fill in System ID on which you want to monitor the KPI.
- Fill in Monitoring profile: IDOC_1HOUR.
- Adjust the Period and Retention time according to your requirements.
- Click (Re)Start collector job.
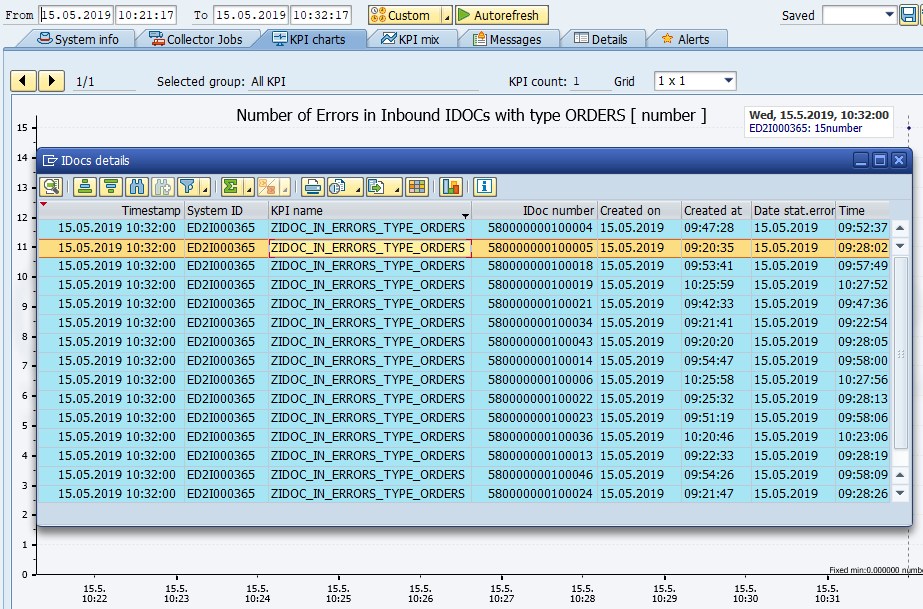
When the Collector job was executed successfully, you may display the results of your custom KPI in the main screen. For further information on how to display a KPI, see (DI-1911) Display KPIs.